

C.Ritter
-
Posts
101 -
Joined
-
Last visited
-
Days Won
24


About C.Ritter

- Birthday 12/08/1995
Recent Profile Visitors
6,384 profile views


C.Ritter's Achievements
")


-
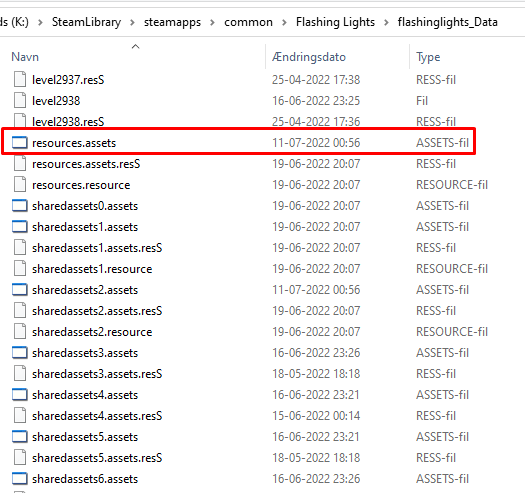
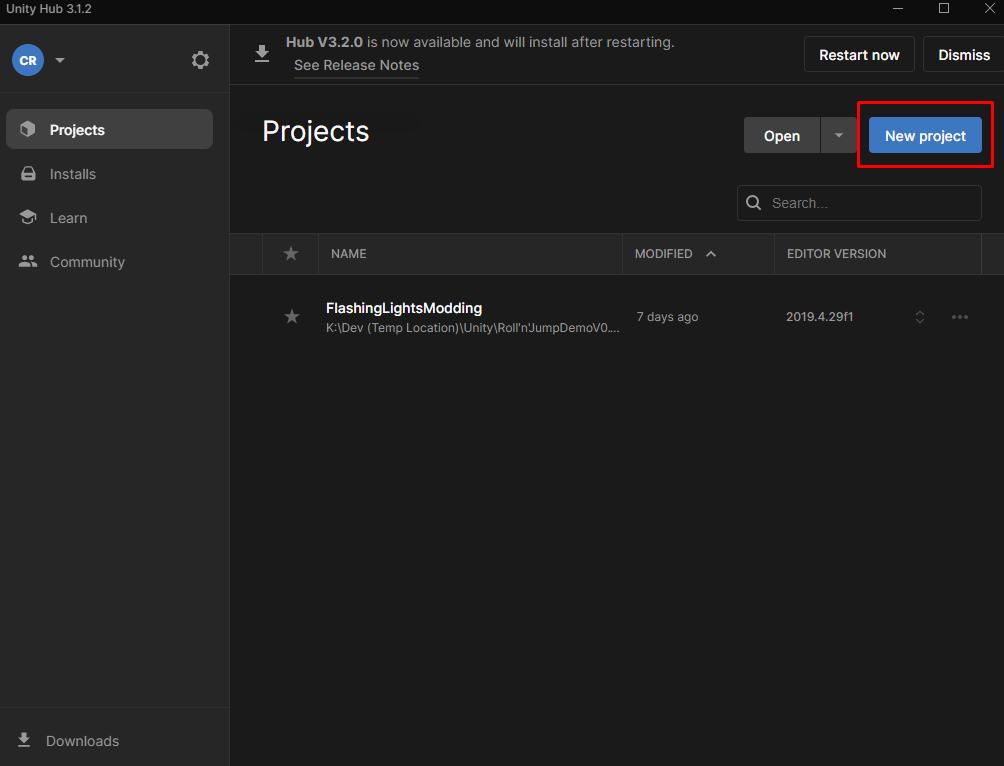
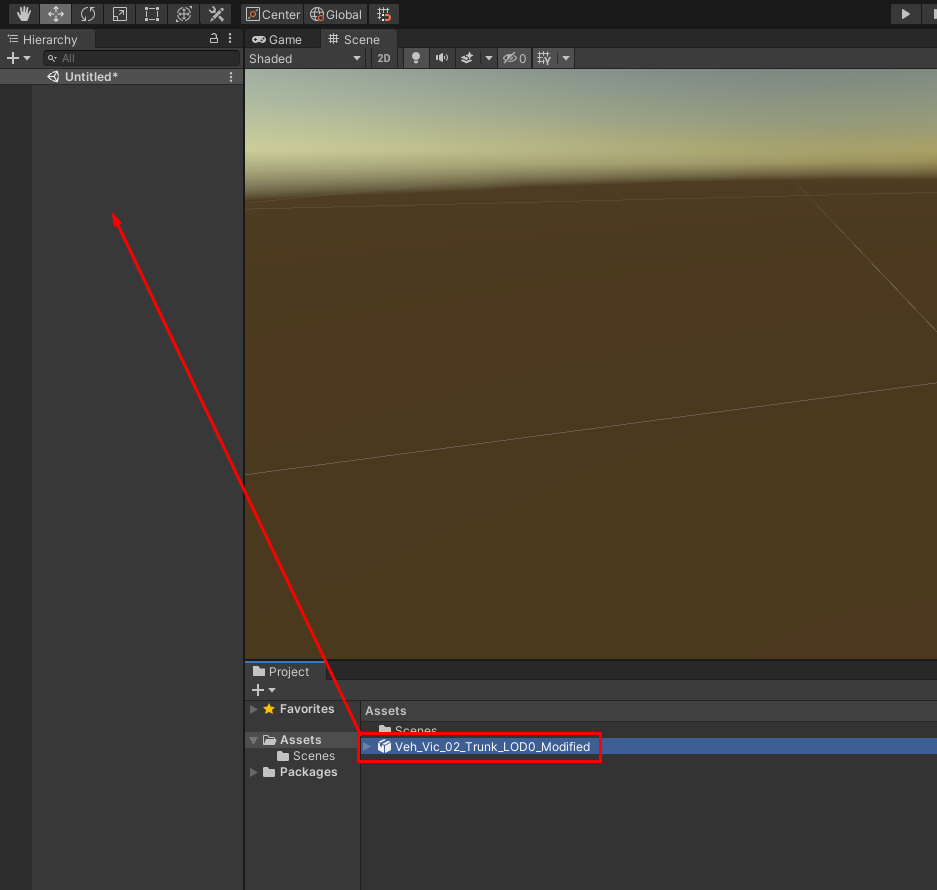
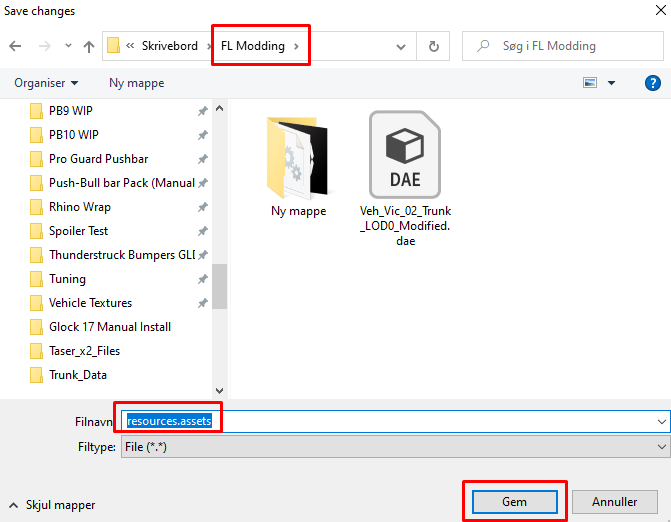
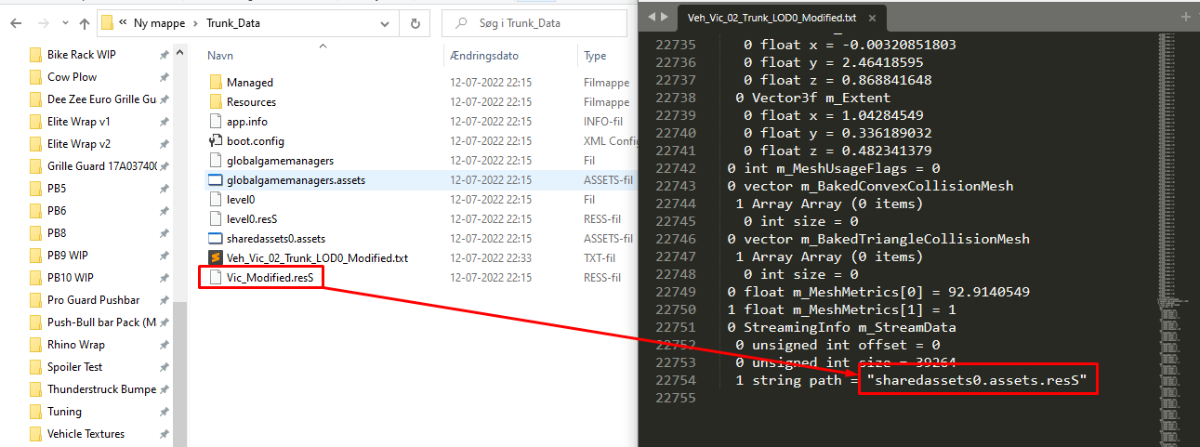
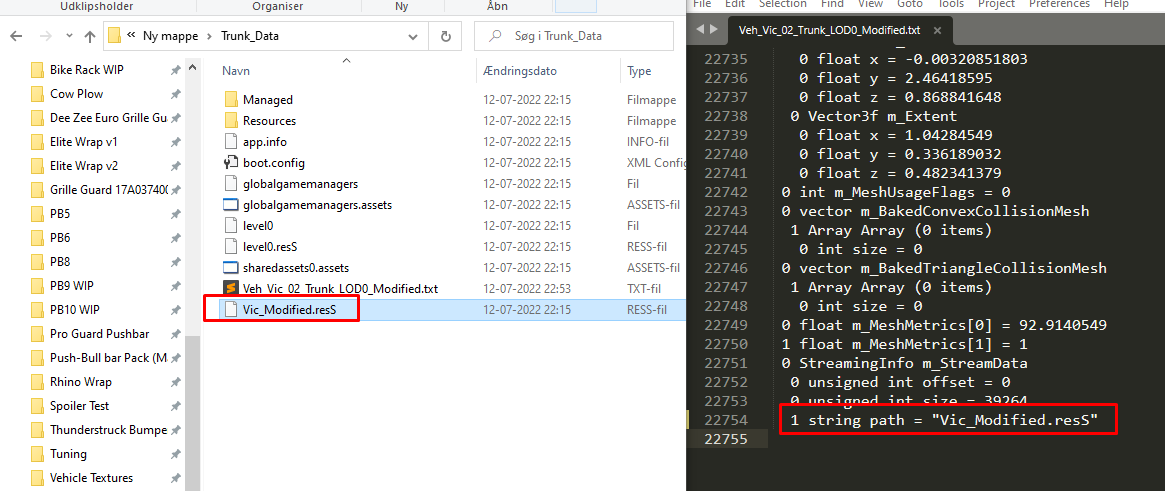
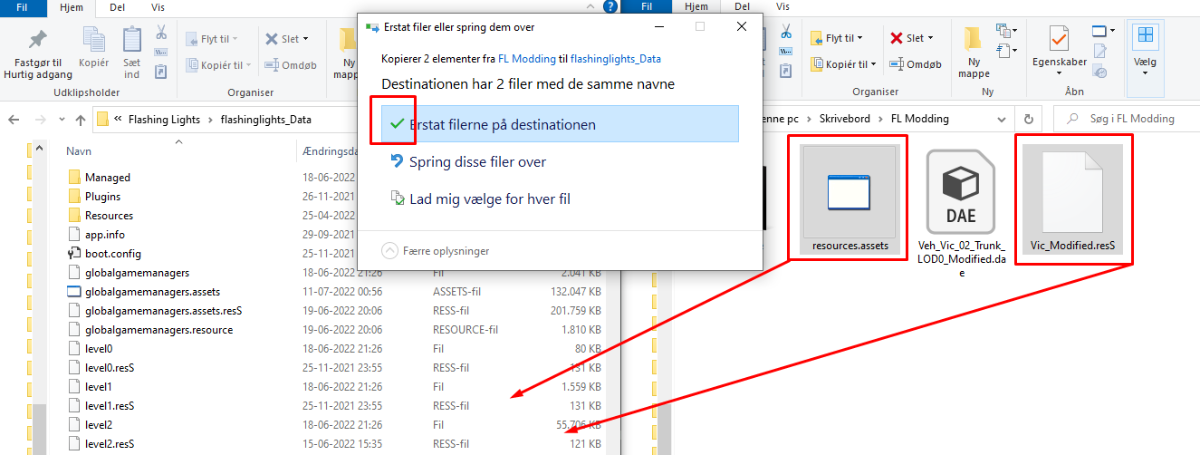
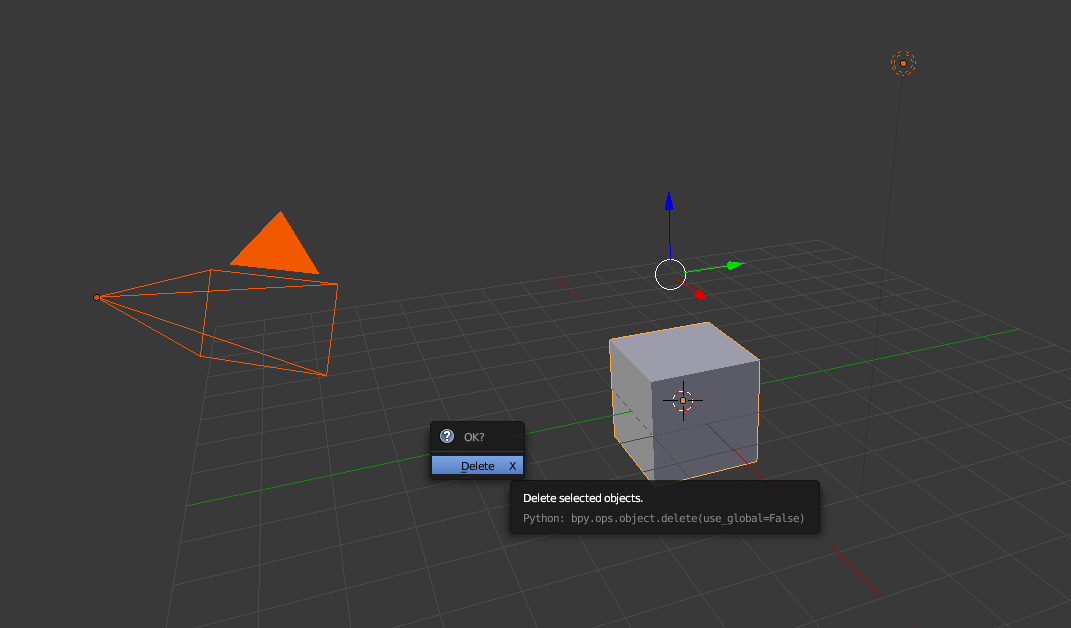
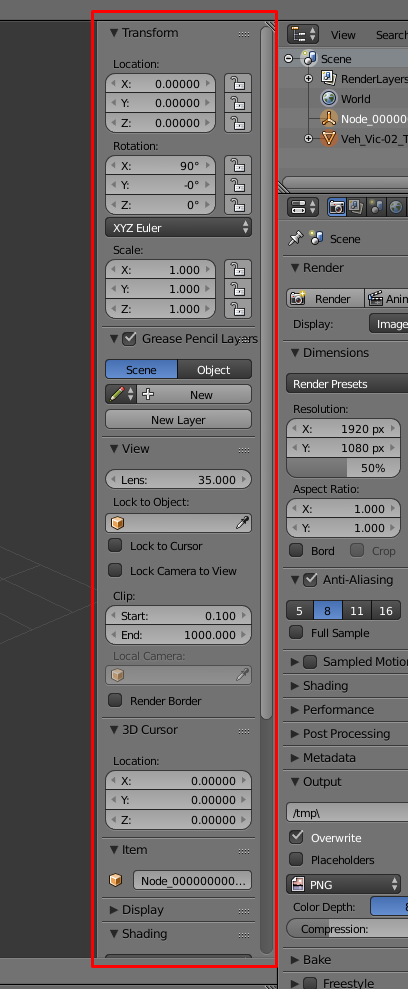
How to edit an original mesh and apply your own edition to ingame. Please note this method works with any mesh. You dont need to change any of the LOD1,2 etc, ONLY the LOD0. How to get the mesh from the game ready into Blender REQUIREMENTS: Basic knowledge how Blender works. (Link takes you directly to the site where to download it) Unity 2019.4.29f1 recommended to use. (Instant download when clicking on this link or find it yourself) UABE 3.0 Beta 1 I have not tested if you NEED the beta version or if 2.2 d works fine, but in this guide we will use 3.0 Beta 1. (Instant download when clicking on this link or find it yourself) ! DISCLAIMER ! You are NOT to use any of the models from FL to use else where outside of FL. This guide is solely only to teach you how to mod within FL. Open up the AssetBundleExtractor Find the resources.assets and open it. (You can also find other meshes in sharedassets2.assets and in globalgamemanagers.assets) First click on resources.assets (Assets) then double click the "Name" so you only see files starting with "w" Find and select the file you are looking for and click plugins in this case i am modifying the trunk "Veh_Vic-02_Trunk_LOD0" Path ID: 1972 Now you click export to .dae and then you make a new folder (optional) but good for traction, i named mine "FL Modding", now save the file into that new folder you just made or wherever you want it (No need to close this window after use, it can be reused by opening another tab, follow the guide to see how.) How to get the mesh from Blender ready into Unity I used version 2.79 of Blender with this guide, you can use what you want. Now open up blender and press A then X to delete the highlighted parts Import the file you just exported. It is a small model which is why you cannot see it Now there is 2 ways you see the object easy 1/ Press "N" to open the right side panel From here edit the "clip" from 0.1 to 0.01 Now scroll in and you see can see the object or press the , on your numpad (Prefered way.) 2/ Press 5 on your numpad to go into Ortho (Only prefered while using 1, 3 or 7) You are now ready to make your edition to it, from here it is your own knowledge or follow the following videos on the basic knowledge for Blender use, Blender Absolute Beginner Tutorial Blender Tutorial For Beginners: Coffee Cup When you have created your model, make sure to join the objects you made to the original mesh (Select them all (not the node) and do CTRL+J) Export the mesh you now have made Choose the name you want (dont matter) and then export it How to get the mesh using Unity into the game Open up Unity and click "New" (project name is optional) and then click "create project" Delete the "Main Camera" and "Directional Light" (Not needed but makes it cleaner) Find your file you saved in Blender and drag that into the assets tap Now drag the file from the assets into the project tap Now you need to build the scene, follow the steps below For this you need a folder if you havent made one for the previous things, choose a filename for the file as well and then save it Select sharedassets0.assets in your ChoosenName_Data with UABE 3.0 Beta 1 The mesh's you made will always be on the topish in UABE so select it and press Export Dump, Dump as text file and save it into the same folder with your ChoosenName_Data (name it whatever but simple enough to find) Then you need to rename sharedassets0.assets.resS for your liking but keep .resS on the back on the name (i am naming mine Vic_Modified.resS) When you have changed its name, you will now have to open up your .txt and scroll all the way down to the bottom of the text file until you see "1 string path = "sharedassets0.assets.resS"" Now change the "sharedassets0.assets.resS" with "Vic_Modified.resS" or whatever you named it, save the text file afterwards and you are now done with this part (you will need to include your ChoosenName.resS into flashinglights_Data along with any other .assets files you may create in the future under a different file name of couse) Now find the file you exported from the beginning and press Import Dump (You can't select all three on the same time for this, gotta to it 1 by 1) When you have done all three files you can now press "File" and click "Apply and Save All" to save the changes and choose the folder you first made (if you made one like i did) then save it (make sure to remove the -mod in front of .assets else it will not work) You can now put the resource.assets and Vic_Modified.resS (or your ChoosenName.resS) file you made into the game folder "flashinglights_Data" and replace the current resource.assets and then you can open your game and see the changes! CONGRATULATIONS YOU SUCCESSFULLY MADE A CUSTOM MESH Here is a preview of how mine looks like

-

Flashing Lights UV Maps (More than shown in Preview)
☆ C.Ritter ☆ commented on ☆ C.Ritter ☆'s file in Original Files
 It's for those the description says
 -
Hello, there already is, it's just more included with another pack:
-
Richmond, Virginia Police Pack (Depreciated)
☆ C.Ritter ☆ commented on TrafficStop108's file in Police
 Remember to have the right tags included, saw you included the weapon tag recently but you have no weapon models in the pack.
 -
 Sorry for the late reply, it does work but you need photoshop or blender to load it.
 -
☆ C.Ritter ☆ changed their profile photo
-
Hey, sorry for the very late response. Vehicle models are not being done due to how long it will take to get it to function properly, you would have to change about 50 files and for every update you would need to redo those 50 steps and you cannot pre-make them to insert next time since the ID's changes and therefor not able to pre-make them to then put in.
-
Version 1.2
140 downloads
This is a full set of all the 3D Character models from the game for use with Adobe Photoshop for re-skinning and 3D preview of your paints. These models were extracted from the Original game by me. * NOTE * These models are purely ONLY for you to mod FL easier, do not take these assets for your own projects! HOW TO USE ================================ In order to use these files for re-skinning and 3D preview of your paints you will need any copy of Adobe Photoshop from CS5 up to the current Creative Cloud versions. Using Adobe Photoshop you can either paint directly on the model, or on the original texture plate and use the 3D view to preview your paint in real time. Mod Pack comes with character models and the textures needed for each model. How to get the .dae files and textures into Blender: Disclaimer ================================= -You are not to attempt to modify or rip this model in any way shape or form. -I am not responsible for any damages done to your game. Please make a backup of any edited files! -DO NOT REUPLOAD WITHOUT MY PERMISSION. -If you have any questions, Problems or Bugs let me know in the comments or tag me on discord in #modding-questions. -Please leave a Review, It helps alot.Free -
![More information about "Clarity [Day & Night]"](https://www.flmods.com/uploads/monthly_2020_05/Clarity_Day.thumb.png.f5955ca3c016e7ba64964ecfa1ff0575.png)
Version 1.0.0
226 downloads
For a bit more realistic lighting environment both in daytime and night time. Files included: Clarity_Day&Night.ini Disclaimer ================================= -You are not to attempt to modify or rip this model in any way shape or form. -I am not responsible for any damages done to your game. Please make a backup of any edited files! -DO NOT REUPLOAD WITHOUT MY PERMISSION. -If you have any questions, Problems or Bugs let me know in the comments or tag me on discord in #modding-questions. -Please leave a Review, It helps alot.Free -
Version 1.0.9
1,008 downloads
These are UVs so you can see the lines perfectly when you're making your textures. These are NOT considered templates but more guidelines. Use these on top of your template for precision. Hats FL_Face-Mask_UV FL_Hat-Cap-01_UV FL_Hat-Fire-1_UV FL_Hat-Police-1_UV Uniforms FL_Cop001_F_UV FL_Cop002_F_UV FL_Cop003_F_UV FL_Cop001_M_UV FL_Cop002_M_UV FL_Cop003_M_UV FL_EMS001_F_UV FL_EMS002_F_UV FL_EMS003_F_UV FL_EMS001_M_UV FL_EMS002_M_UV FL_EMS003_M_UV FL_FD001_F_UV FL_FD002_F_UV FL_FD003_F_UV FL_FD001_M_UV FL_FD002_M_UV FL_FD003_M_UV Vehicles FL_FTR_Exterior_UV FL_Ambulance1_Ems-02_Body_UV FL_Car16-Police2_Body_UV FL_EMS-Truck-03_UV FL_Fire-02-2_Body_UV FL_FireTruck-03_UV FL_SUV_Fex-01_Body-UV FL_TowTruck02_UV FL_Van02_Body1_Paint_UV FL_Van02_Body2_UV FL_Vic-02_UV FL_CTA_exterior_UV FL_FTA_UV FL_Veh_Fire-02-3_Body_EngineUV FL_Veh_Fire-02-3_Body_Details_EngineUV FL_Veh_Fire-02-3_Cabin_EngineUV FL_Veh_Fire-02-3_Cabin_baked_EngineUV FL_Veh_Fire-02-4_Body_RescueUV FL_Veh_Fire-02-4_Cabin_RescueUV FL_Veh_Fire-02-4_Cabin-Baked_RescueUV Weapons FL_M600_UV FL_Pistol_AP85_UV FL_Shotgun_590_forend_UV FL_Shotgun_590_UV FL_Tazer_UV Miscellaneous FL_Cones_01_UV FL_Defib-01_UV FL_Fan-01_UV FL_FireAxe_UV FL_FireExtinguisher-01_UV FL_Flare_UV FL_FractKit-01_UV FL_Handcuffs1_UV FL_Ladder-01_UV FL_SceneLight1_UV FL_SpeedGun-01_UV FL_SpikeStrips-01_UV FL_Stretcher-01_UV FL_WarnBarrels_01_UV FL_MedBag2_UV FL_Halligan_UV FL_Battering_ram_UV FL_Spreader_UVFree- 2 comments
- 5 reviews
-
- 6
-

-
- uv uniforms
- uv hats
- (and 3 more)


.png.bd17c885a31d80d579b3cab8e358df87.png)
.png.ed4f6e3e4ef21bd424e76ba22d488c32.png)